UX Research Tips & Toolkit
Before we get into the specifics of the subject, always remember that the key point of user experience (UX) research is to become the observer, to truly understand and empathise with the participants you’re researching. No tool will magically do that for you. It’s only through the lens of different research methods and detailed analysis do we end up in a position where we can best start making steps towards testing recommendations for change.

I’m not saying that the items I list below are the best, or the only approaches/tools you can use for user experience (UX) research. They are simply what I have arrived upon after many years of searching, testing and evaluating. Some things do change though, so I’ll try and review this post as/when I have anything significant to add.
It’s also worth pointing out that I’m not affiliated, or wedded to the tools mentioned below. If I find something that works, and gives me the results I need, I tend to stick with it until a tool arrives that does a better job by reducing my workflow friction in any number of ways.
Although there can be ‘all-in-one’ tools out there, that claim to roll all manner of features under one package, I have yet to find one that has all the features and nuances of the ones I mention below.
Finding Your Audience
When it comes to your research participants, this can vary from project to project. You may have an established user-base from which you can put out an open call to action, or be able to easily target specific user-types.
If you’re in the pre-product/discovery phase of a fresh project, then I’d always work carefully to establish persona’s for the core user types, and potentially use services such as User Testing to litmus test for the target audience(s) and get an unbiased viewpoint on the direction any research is heading, early. Stakeholder/internal research is also paramount to identify any early mis-matches in expectations and thoughts around the target audience and project as a whole.
As overarching ‘Research’ methodology/toolkit is quite wide-reaching. I’ll break them down into qualitative/qual (interviews, observational research) and quantitative/quant (statistical, number/data based research) contexts, and then general productivity tools/tips:
Qualitative Research
It’s good to have a set of dependable tools for capturing information that is more freeform - whether it be from surveys/forms or directly from a interview session. Identifying the audiences you may wish to approach for such research approaches varies depending on the project.
Google Forms
Google Forms is a perfect platform to create simple, yet effective questionnaires for a wider pool of research participants to complete. You can use likert scales (1-5 / 1-7) and targeted open ended questions to get good contextual information from a large, or curated pool of participants.
I also use Google Forms to create easy to read interview/information consent forms. The key with any interview is to let the participant know how their information is going to be used, and by whom - to ensure that their data is protected and kept private. By all means have physical/paper forms if you wish (and have some as back-ups), but I tend to find digital forms a much tidier way to ensure this consent step has been addressed. You can also use the start of an audio recording to confirm consent has been given as well.
Audio / Sound
I do audio recordings of a lot of 1-to-1 or small group interviews - depending on the circumstances/project of course. This means that I have a reliable reference I can refer to should notes be light at any point. Additionally, with consent, audio clips can be a very powerful item to use when playing back research findings to actually hear the participant say the words, rather than just reading them. Audio tends to be a less intrusive for in-person interviews. However, I’ll cover screen-based and video a little later in the post.

Although you could record audio with your phone (and many folks do) - I use a Jabra Speak device because the sound quality is fantastic. You can simply plug it into your laptop via USB (or link via bluetooth to your mobile if you wish) and it picks up multiple voices with ease - so it works really well for single or group situations. Hopefully it goes without saying that having a good, reliable laptop is a good thing to have to hand for most of the situations I’m going to describe. I have found them to be more reliable from a battery perspective, and you won’t get all in a fluster should your phone start sending unforeseen notifications or suddenly give you a low battery warning mid-interview!
I’ve used the in-built MacOS QuickTime and free/open-source Audacity for interviews in the past. Just ensure that you do a proper test on your set-up before your first session - as there’s nothing more heartbreaking than realising you’ve not set-up the right inputs, or the recording fails for some reason.
Having software like Audacity is great because you can see a really nice big timecode which you can reference in your notes periodically, so you can easily scrub to that part in the audio when reviewing your write-up of the session.
Google Recorder (and the Samsung voice recorder) have live/AI transcription, which is amazing, and again, may be a better route depending on the complexity of the interview - but this will only really work for 1-to-1 interviews - and I haven’t come across a situation where a quick note of a timecode wasn’t just as good as a full interview transcript!
Pen & Paper / Notes
Yep - in this technological age there is still a space for pen and paper. I always have a notepad and a few pens when doing interviews. If anything it’s perfect for quick reference scribbles, or even drawings, while talking through ideas.
I’d always recommend in any interview that you have a dedicated note-taker and separate facilitator though. It’s very hard to follow an answer to a question, while note taking, and ensuring you’ve actually listened properly. You can also work as a team to ensure the interview is on-track and hasn’t skipped any points that may have got lost during the natural flow of questions and listening to responses.

I have taken digital notes in the past - Evernote being my tool of choice (especially as it’s super easy to share your notes), but any digital note-taking software should work. Just make sure it’s something simple and reliable - as when in the thick of an interview you won’t have time for user interface (UI) interactions and formatting. I tend to use a lot of indented bulleted lists for points off main points. I have known folks to use mind-mapping software to the same ends, but choose the tool that works best for you - as you’re the one that needs to make sense of any notes after the interview.
When doing in-person design sprint workshops or brainstorming sessions you’ll find a good stack of reliable pens, post-its, blank A4 sheets and coloured sticky dots will be the order of the day!
Video / Screen Capture
I purposefully left this after the items above, as in most interview-based scenarios all of the above will put you in a pretty good place. However, what if you have a user interface (UI)/prototype to test, or need to see the participants face/reactions during your instructions/questions, or have to carry out your session remotely?
There are a lot of funky tools out there that do a lot of clever things in this space. The issue I tend to come across is that you are sometimes limited by the circumstances under which you’re recording a session, whether it having to be on their own machine, or remotely, for example. With this in mind, you will need a simple low barrier to entry set-up that won’t result in lots of technical calls/set-up.
Zoom and other video conferencing tools do have the in-built options to record your current session - if you get your participant to share their screen at the same time, then you have the perfect set-up for looking at interactions and capturing audio for desktop/laptop-based systems.
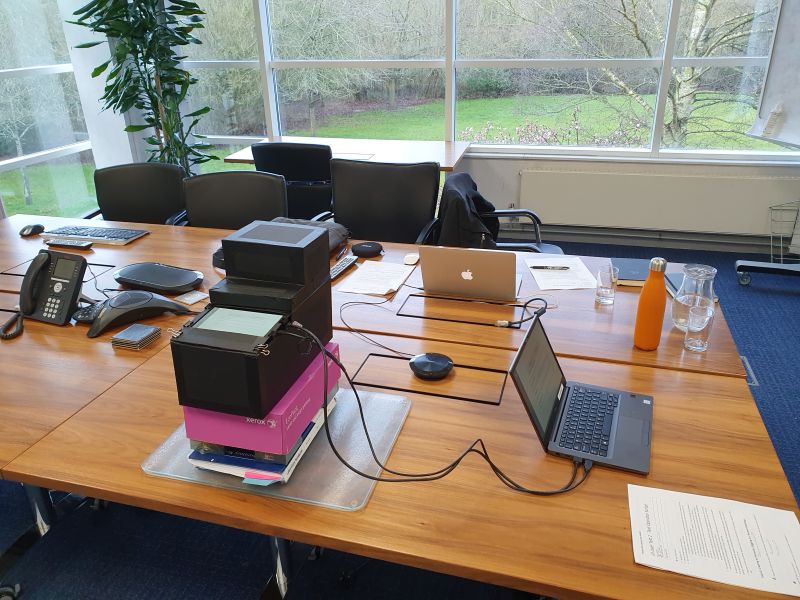
My solution? Google Meet. I can then use my external microphone as the mic (when in person), and Hangouts/Meet will also work on Phone/Tablet devices for screen sharing on those devices. I’ve often run a Meet session in the same room as the interview/test, using the mic to capture the main audio from the session, and used MacOS Quicktime, again, to get a screen recording of the shared Meet screen. It’s a little low-fi - but is a low-cost solution for me, that gets the fidelity of results I need to capture.
If I just need situational video recording, then I have a little tripod for my mobile that I can set-up for a video capture of the interview. I have toyed with the idea of getting an external camera I can plug into my laptop to remove the ‘phone reliant’ nature of this approach, but with a charger, the phone has performed well for this kind of task.
In a post-COVID world, the options above are likely to become more of the norm for ‘face to face’ interviews. I’d say that if you’re just conducting a verbal interview, with no UI/interaction components, focus on capturing good quality audio over recording the video on the whole session (you’ll also get much smaller files to deal with!) - and do note the time-codes as you go through at key points, as this will help any revisit to the recordings much easier to navigate.
I’ll leave the tools for creating prototypes and testable demos for a dedicated design/development post.
Photography
Yep - the trusty camera has a very important role in research. I’ve always used my phone camera to capture any environmental references (for example: where and under what conditions the participant works) and even photographs of the participants themselves. This is obviously completely subject to what the project is, but remember that images are great to reinforce any quotes/audio clips you may use in your summary notes/presentations, and having a good reference for any environmental factors that may be of value is great to capture (always with consent of course).

When running design sprint workshops written output such as post-it notes and whiteboard notes can be easily captured for documentation with a photograph. Microsoft’s Office Lens is great at making sure that you end up with a clean, clear image of a variety of written material too.
Quantitative Research
We’ve done the qual now lets look at the quant. I would always say that qualitative research (when prepared for properly) will give you the best combination of the what and the why, but sometimes you need to get a wider context - to see what is happening before you delve into the why. Quantitative data can act as a good reference point for pre and post changes to show the measurable effects of your work.
Analytics
Google Analytics tends to be a staple reference for most website projects, and can a be useful first port of call to review how traffic is flowing/distributed across a site - your what is happening, on a day-to-day basis. Although it can also be used on native/web-based software, I haven’t come across it in these scenarios much at all.
Sometimes you’ll have to rely on server logs, or whatever information the client can supply within their privacy/security terms.
Raw usage data can be really interesting to explore, but always try not to assign much meaning/interpretation to any trends or results until it can be corroborated with additional investigation/qualitative methods - the all important why.
HotJar
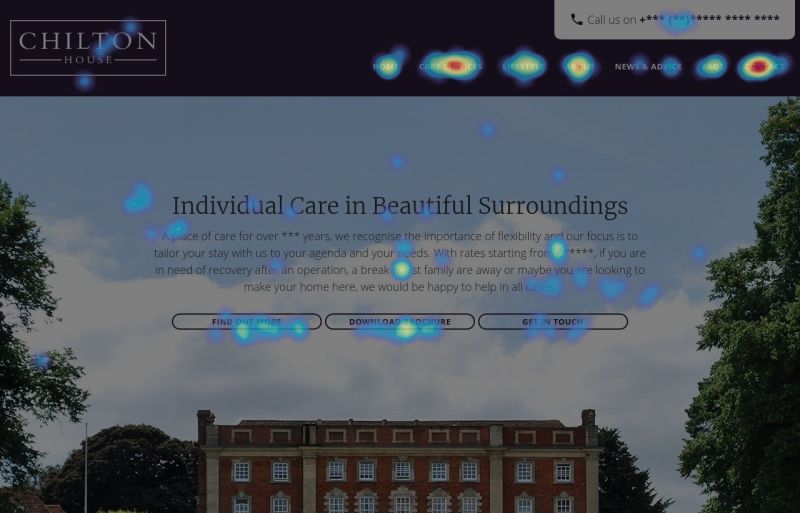
I can’t say enough positive things about HotJar. It can be implemented quickly on websites (and apps) to show interaction/scrolling heatmaps, captures session recordings of user interactions and allows you to run simple in-site/app surveys. The information that HotJar reveals can also be broken down by screen-size, and have additional filters and conditional statements added to how data is captured.

HotJar is still a what tool - with the exception of the survey portion of the feature set - but it produces some really valuable data which you can start to combine with analytical data, to start preparing for more in-depth qualitative research. It can also be used as a review tool, to quantify any changes in behavior/interactions, at a large scale, as the results are nicely aggregated, as well as being available on a case-by-case basis.
Additional Tools and Tips
I’ve covered my main qual and qant research tips above. I have some additional tools that really help to accelerate the research side of my work.
Lucidchart
Lucidchart is a browser-based tool for creating a wide variety of diagrams. I use it to create representations of user journeys and to produce product maps further down the line. It’s a very easy tool to use, and it has simple sharing options to allow clients to access documents without the need to log-in/create an account.

Virtual Whiteboards
Lucid have introduced a new tool called Lucidspark - a remote collaboration space for brainstorming, sharing and voting one ideas as a group. As mentioned above, in a post-COVID world this type of tool is likely to get a lot more use vs in-person post-it/whiteboard research workshop sessions. Some alternatives to consider are Miro and Mural.
Google Suite / Workspace
The Google Workspace (formally Google Suite) toolkit is invaluable to my work. I’ve mentioned Google Forms earlier in this article, but I write any long-form research findings in Google Docs and will tend to boil them down to a nice, easy to digest presentation in Google Slides. The collaborative nature of these Google products (again, not requiring a log-in or account when sharing) allows for a reassuring single point of truth, and can be captured as a PDF once comments have been resolved, and a ‘final’ report is delivered.
I hope that was a useful insight into my UX research approaches, tools and tips. I’ll be writing additional posts on my approaches to design and development as well.
 David Kidger is a UX / UI designer and developer. He founded